Kick Stand Relocation Kit
Kick Stand Relocation Kit
Thank you for purchasing the HVCcycle Kick Stand Relocation Kit.
HVCcycle has been battling the problem of modifying the side stands on the RDs when aftermarket pipes are installed. Since we now sell our own line of exhaust systems, we did not want to leave our customers scratching their heads trying to figure out a way to allow the side stand to fit with expansion chambers. So we sat down and came up with a solution that will be easy to install, maintain our high quality standards, and most importantly WORK.
Our kit accomplishes two things. It allows the stock side stand to be used with aftermarket exhaust and it takes out that terrible lean angle of the bike when it is resting on the side stand.
This kit will work with any after market exhaust using your existing side stand on the following motorcycles:
- Yamaha DS7/R5
- Yamaha RD250/RD350
- Yamaha RD400
Kit includes:
- Our steel bracket that has black oxide coating to prevent rusting
- A longer spring that is designed and manufactured just for this kit
- Hardware and a drill bit
Installation of the side stand kit will require the basic hand tools, a drill and either a pair of vice grips or a spring installation tool (recommended).

Instructions
- Remove the existing side stand and retain the side stand, bolt and nut.
- Remove the left-hand engine point cover; this is the round side cover.
- Removing the left exhaust is optional. Please note that when drilling the hole you could hit the exhaust pipe.
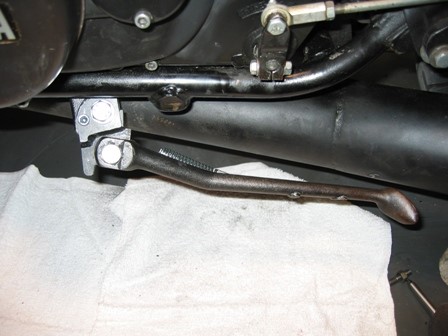
- Clean all old grease and dirt off of the kick stand mount. Slide the HVCcycle bracket onto the existing mount with the small hole up. This will be snug and may need to be tapped into place with a dead blow or rubber mallet.
- Install the large bolt supplied in the kit with the washer under the bolt head. This also may be snug.
- Using a mallet, tap the bracket so it is located all the way forward.

- Install the large nut supplied in the kit and tighten so the bracket will not move.
- Using the supplied drill bit, carefully drill the motorcycle bracket and the back side of the HVCcycle bracket using the small hole in the top of the HVCcycle bracket as a guide. Try to drill square with the bracket. If the hole is drilled at an angle the small screw will not sit flush.
The bracket is also very thick so it will take a little patience.

- Install the 6mm socket head bolt thru the hole and install one nut on the back and tighten. Install the second nut so two threads are showing through the nut.

- The side stand will need to be modified; cut the foot ear off in two places.

- Install the side stand onto the HVCcycle bracket using the existing bolt and nut retained in step 1.
- Install the supplied spring with the spring coil side attached to the side stand. Note: If the spring is too close to the exhaust, try flipping the hooks around.

- The kick stand should now rotate up and down and stay in position. If you removed the exhaust, install the exhaust at this time.
- OPTION FOR THE SPRING LOCATION: If the spring still hits the exhaust you can install the spring bolt backwards. You will also need to cut the spring tab off the kick stand and re weld it to the front side in the same location.

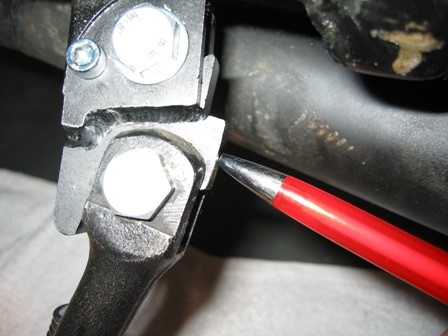
- The up stop of the HVCcycle bracket is made with extra material to allow it to be used with many different exhaust systems. This stop can be filed down to allow the side stand to stow in closer to the exhaust pipe.
 |
 |
Warning: Please pay attention with this step. If too much material is removed, the side stand will hit the exhaust pipe. HVCcycle will not warranty the bracket for this mistake.
- Install the side cover, clean up and go riding!
